|
It's been far too long since I added a blog post here, so I am just popping in to say hello, and to let you know that there will be some exciting changes made to this site! I will be adding several more dyeing tutorials, videos and homeschooling ideas. To update anyone interested, here is a little of what has been going on lately: we are still unschooling and enjoying every day together. My business (New Earth Baby) has moved from making and selling cloth diapers, to exclusively making and customizing baby carriers and wraps, especially dyeing. Another thing that has been keeping me busy, is that I volunteer my time to teach ballet and tap to some local homeschooling students. It has been so much fun! For anyone interested in ballet, I will be sharing some tips on making a DIY barre at home, putting up mirrors for a temporary studio, and some tips on forming your own local homeschooling co-ops. For now, I'd like to share a slideshow of some of the items I've cranked out of my shop within the last month or so. Enjoy!
0 Comments
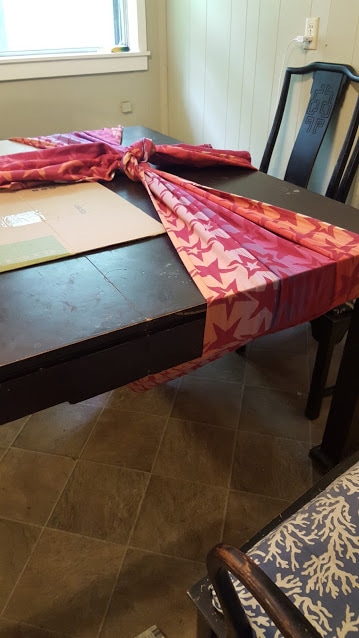 Size 5 Pellicano Astrid Fion, tied on top with a tight knot Size 5 Pellicano Astrid Fion, tied on top with a tight knot Do you have a woven wrap that your child has outgrown? Or maybe you need to find a new way to use the wrap that you carried your little ones in. This is the perfect way to entertain your children indoors. My son and daughter love it when I tie a hammock under the dining room table! We use my size 7 Ellevill Zara Tri-Green and my size 5 Pellicano Astrid Fion. To start, you need a sturdy table. It should not be a circle table or one that can buckle or fold in the middle. Place one end of the wrap on the tabletop, in the middle. Take the other tail end of the wrap and pass it underneath the table, then bring it up to the top where the other tail is. Tighten the hammock by pulling up. I usually start with the hammock hanging about a foot off the floor, since it will sag considerably when the child sits in it. Tie the two ends together with a tight knot. Leave the tails long enough so that when the child sits in it, as the knot tightens it won't slip completely out. You may need to adjust a few times to get the right height for your child. My daughter like to place her bed pillow inside for her head, and they will est lunch in there and play on the tablet, read a book, etc. It's too much fun! Some reminders before I go: - Use only woven wraps that are approved for babywearing. Quilting cotton, bed sheets, knit/stretch fabrics and most synthetic fabrics are not recommended and can be dangerous to use in this manner. Woven wraps are made with the sole purpose of carrying babies and are woven to be safe to use this way. Stretchy wraps, including Moby wraps, are not safe to use for this project. - Monitor your children when in the hammock. - Use common sense when deciding whether or not your table is strong enough to support the weight of your child. - Do not use for infants/children under 2. - These are not to be used for naps or sleeping. If child falls asleep in the hammock, remove them and place into a crib or bed, etc. Many babywearers also use this technique to "break in" their brand new wraps, so if you have a new wrap that is a bit stiff, you might try this as well! Of course, use caution when doing so, and try not to leave the hammock up for days at a time, as some wraps are more prone to perma-creasing. 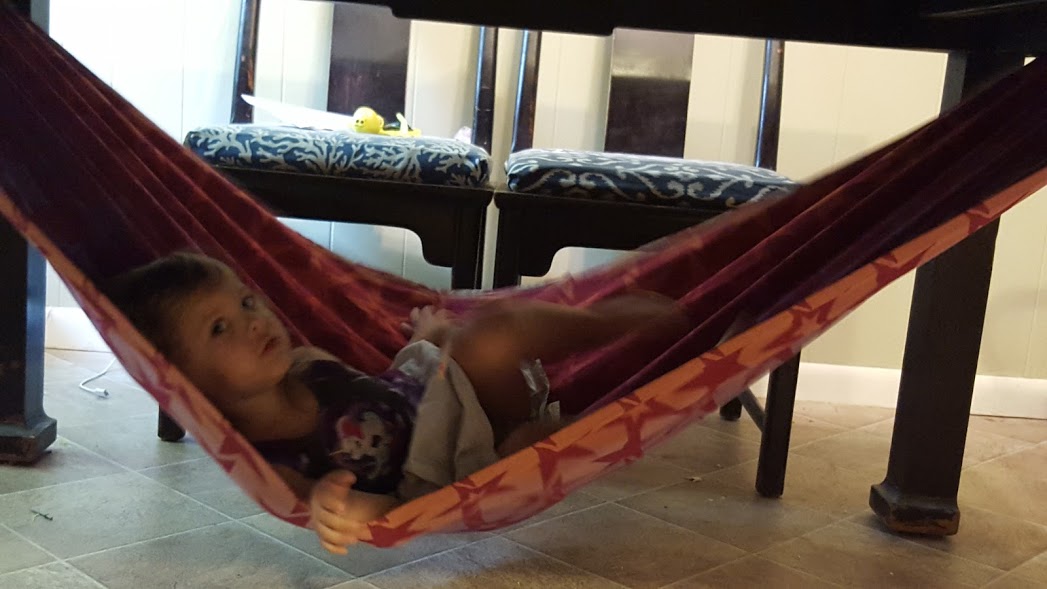 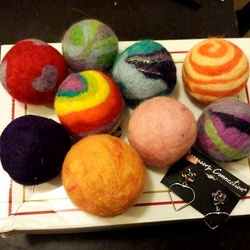 My own little wool solar system! LOL My own little wool solar system! LOL I've always intended to try using wool dryer balls for my laundry, but I never got around to purchasing some. Recently, I met a local mom who makes and sells them, and was able to get my hands on a set of 9. I've had them for about a month or so, and have become a big fan of them! In the past, I have made my own dryer sheets, using flannel wipes dipped in vinegar and essential oils for fragrance, but I definitely prefer using wool now. Here are some reasons why:
1. They cut down on drying time and energy usage This is due to the fact that the balls aerate the load more effectively, fluffing your clothing or sheets, etc., and allowing the heat to be distributed more evenly throughout the load. Before using dryer balls, I had to run my dryer multiple times to get the load completely dry, sometimes even 4 times! With the dryer balls, I was seeing a huge improvement and only sometimes needed to repeat it for a second cycle. Now I have a different dryer (a used older model) and I don't even have to run it for a full cycle; a full load of jeans and towels takes only 1/2 of a cycle! 2. They can help with static cling If you're like most people, you don't separate type of fabric (fleece pullover sweaters get thrown in with thin cotton shirts and underwear, for example). Certain types of fabric produce more cling, and wool dryer balls help keep them separated. 3. No chemicals! Wool dryer balls are balls of felted wool. That''s it! No chemical processing needed, no artificial fragrances, either. I sometimes add a few drops of essential oils to one or two balls, which is lovely. I prefer lavender, and it makes my laundry smell so amazingly fresh and clean, without the harsh, harmful chemicals that many dryer sheets contain. 4. Easy to use Throw them into your dryer and leave them in there for the next load. My only challenge in the beginning was keeping the balls safe from my nosy kids and dog, but now they never leave my dryer and it works out perfectly! 5. They are way cool and can have crazy cute designs felted into them Yes, this is a selling point for most of us, admit it. Now, my local mama made me a couple of special requests, including a rainbow swirled ball, and one with a pony. She even added some glitter threads for the pony's mane! Since then, I have seen her make some in the style of a Pokeball (can you say MUST HAVE?), Dr. Who themed, Legend of Zelda, Batman and Star Wars!!!! Needless to say, my geeky self is going to order some of those ASAP. I am thinking of gifting some of my balls to someone in order to make room for a Pokeball and Rebel Alliance ball....that's a good thing, right? Now, for purchasing details! I have seen some brands on Amazon sell some white, organic wool balls and are a good price, but if you fancy the cute decorative balls (which is totally worth it, IMO), there are plenty of WAHMs and independent businesses that sell them at comparable prices. For example, the ones that I purchased were from Katelyn's Needle Felted Creations, and are available to purchase as sets or individually. She is also very knowledgeable and can answer any more possible questions you might have about using dryer balls. Check out her Facebook page, linked above, or click on this link: https://www.facebook.com/pages/Katelyns-Needle-Felted-Creations/474901385997837?pnref=lhc I don't know if I want to admit just how happy it makes me to open my dryer door and see 9 little colorful balls smiling up at me! Having the whole 9 amuses me because it makes me think of the Solar System and how I have my own little set of planets (I'm counting Pluto -haha!). OK, that's enough geekiness for this post. To wrap up this review, let me just say that you NEED to get a set of dryer balls, and I would love to hear about your experiences using wool. Don't forget to check out and "like" Katelyn's page! If you haven't "liked" my Facebook site, please check it out. Right now is a good time to do so....it's giveaway time! This time, to celebrate reaching 500 fans, I have joined forces with some amazing WAHMs who also offer high quality handmade items. Altogether, there are 6 prizes to win in this multi-vendor giveaway, including: -$15 store credit at New Earth Baby -$10 store credit at New Earth Baby -$10 store credit at Bear Monkey Bottom -Custom Child Footprint Vinyl Decal (FFS) from Bright Eyed Design -$10 store credit at Goo Goo Buns -$10 store credit at Mummy Coull plus free shipping To enter, click on the link below. Submit your contact information and be sure to visit and "Like" all five of the vendors by clicking the blue "Like" button underneath each logo. This is a requirement in order to claim the prize, and I will be confirming that all potential winners have followed the rules. The contest will run until Sunday, February 15, 2015 at 6:00pm CST. Winners will be drawn at random and will be contacted privately via email. Don't forget to share with your friends - the more, the merrier! Thanks again for your continued support, and may the odds be ever in your favor...! http://w.heyo.com/cb179a 
Today I read an enlightening article and it is so potentially life-changing that I must share it. The article was posted by Apartment Therapy and was shared by another site called Wife On the Go, which titled it: 7 Things You Do That Keep You From Having a Clean and Tidy House You see, all this time I thought that my messy and untidy house had something to do with the extra human beings I've accumulated throughout the years. They have grown accustomed to calling me titles like Mom and Wife, which, when combined into one person, means "nanny", "housekeeper", "maid" and "slave". Unfortunately for us all, this Mom/Wife has never gotten the hang of these job roles. When that fact becomes glaringly obvious (i.e., a house guest that makes it very clear that my cleaning standards are substandard), I hastily open my Pinterest app and attempt to learn by osmosis the magic of having a lovely, tidy and well-arranged home. However, the magic and wonder ends as soon as I close the app. My home is not a haven, it is not Pinterest-worthy and the little Jiminy voice inside me tells me that it's OK to be myself. But every so often, I come across an article or even a person whose opinion makes me stop and wonder if Jiminy Cricket is leading me astray. Fortunately, there is hope. According to this article, there are 7 things I have been doing wrong. If only I knew about this yesterday! Needless to say, I shall be looking into practical ways to apply them. Let's tackle them together, shall we? #1 - You're not cleaning as you go! Well, I've got to say, this is too true. There are times that one of the kids, or the dog, knocks over a cup of juice and I reach for a towel, throw it on top and step on it a few times, pick it up and throw it into the hopefully-empty washer and call it a day. That is definitely a no-no. It also mentions re-hanging clothes in the closet. I can see how that would be a good idea, yes. But rifling through the pile of clothes can be productive, too! Just think of all those long-lost toys you've discovered in piles like these! Win-win, I say. #2 - You're spreading your mess by not limiting activities to their appropriate rooms. I totally needed to be reminded that food should be eaten in the kitchen and/or dining room only. Not in the living room, where Dinosaur Train is playing. And definitely not in the toy box or under the bed, because that would really be unhygienic. That almost never happens in my home....ahem. Moving on. #3 - You're letting all the dirt in! This is something completely and utterly 100% preventable. By keeping your house free of literal dirt, you are cutting down on the mess and clutter. It's a fact! So, since floors need to be sterile and clean enough to eat off of at all times, shoes off! Put a sign on your door, harass your guests, do whatever it takes to ensure that dirt does not invade your house. In fact, the article mentions keeping your windows closed in case there is construction going on in your neighborhood. Just to be safe, I will be doing a 12-mile perimeter check of my city and keeping an eye out for any new construction sites daily. Of course, don't forget that human skin sheds dead cells daily, at very alarming rates. To be safe, avoid scratching skin as much as possible. Dead skin = dust, ladies and gents, and that is dirty. No one likes to see your bookshelf covered in dead skin. One word: lotion. Hand a bottle to your guests as they walk in. After they've removed their shoes, of course. #4 - Have the right tools and supplies on hand. The article mentions having sturdy, well-made tools, and I have to admit that I feel ashamed that I have no idea what this means. Maybe I need to spend more time in the cleaning aisle. Oh, if only I could know the wonders of the cleaning aisle. Instead, I am obliged to do a mad rush down the aisle, running for my life as my eyes tear up and beg for mercy as the host of smells peel the layer of my corneas off just as effectively as it promises to clean the film of grime from your shower faucet. I grab sponges and dish soap blindly, hoping that they didn't change the colors of the labels or move their location next to the display of sturdy, well-made tools that I can never seem to get a good look at. #5 - You're not efficient! There. They said it. The article says to do one room at a time, keeping your tote of supplies (I guess one of those sturdy tools mentioned in #4 is a tote) with you at all times, and take a garbage bag with you. I'm thinking I might need one of those janitorial carts that maids use for hotels. This could work. The only problem is, the article doesn't tell me where the kids are while I'm cleaning room to room, from the back of the house to the front, back of the room to the front, top to bottom. The advice is: "Don't switch tasks, get distracted and start something else or repeat yourself." I don't know about you, but kids are pretty distracting. Especially when they want to "help" me clean. Oy vey. And further, it says nothing of how long my kids are expected to leave it untouched. All of this would need to be repeated almost constantly in a full circle in order to keep it neat and perfect, which sounds exhausting. Of course, there is also no mention of the dog or husband, which we all know is comparable to 7 more children. #6 - You're not scheduling. This is where I just hold out my hands and let you lead me off to the dungeon. There will probably never be another human alive who is worse than me at scheduling things. My lack of scheduling my life and the lives of the people (and dog) in this house is severely affecting the tidiness, according to Apartment Therapy. Their advice? "Schedule it like you would an appointment or job responsibility — something in your calendar you have to keep." Well now, that would work a lot better if I owned a calendar. Maybe I should find a nice little puppy calendar. Then I could stick it to the side of my fridge and forget about it, and it would be January all year long. #7 - You don't make it fun! So wait...what you're telling me is....cleaning is supposed to be.....fun? Mind.blown. The article mentions putting on some Madonna, or listen to some educational podcasts to get smarter while I vacuum. Wow, if I were that easily entertained, you're right, Apartment Therapy; cleaning WOULD be fun! At the end of the day, I look around and see a kitchen table piled high with crafts, walls proudly decorated with crayons and markers, juice stains dotting the carpet to make our very own version of the Twister game board, and piles of laundry that hide treasures and wrappers. I see kids who remember to take their dishes to the sink, but then drag out every toy they own into the living room and could find a permanent marker and a stick of gum in my purse blindfolded, whereas I'm digging in my purse for the keys a full 10 minutes before finding them in the pocket of the jacket I wore the day before. In the end, I see kids who are allowed to jump on beds and I hear their giggles as I pin articles and photos of beautiful houses with clean baseboards and vacuumed corners. And, instead of getting up to attach the hose to my vacuum and find an appropriate Madonna song to listen to, I join them in their ninja jumping tumbling game. Because I'm a mom. 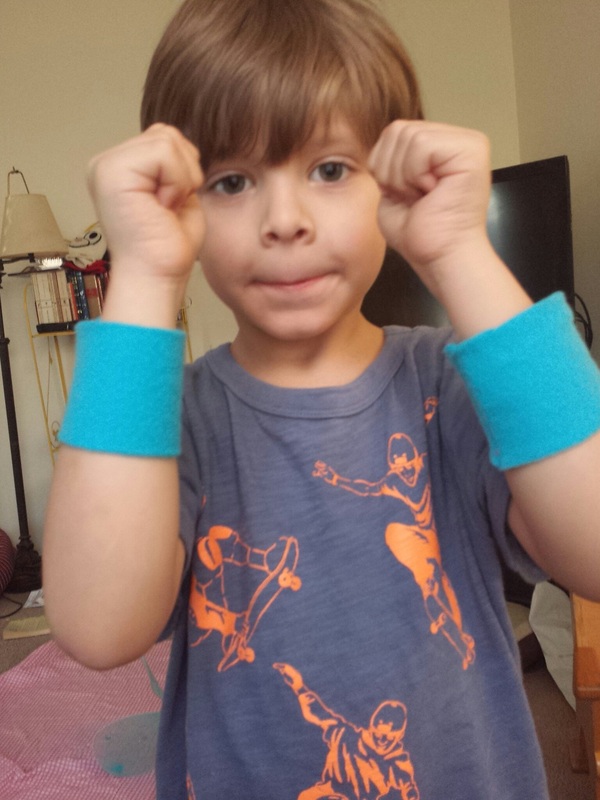
My son, showing off some arm bands he sewed all by himself. I should have been cleaning, I suppose?
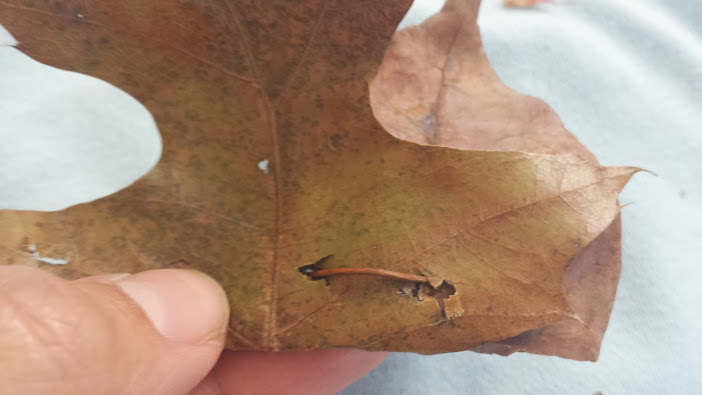
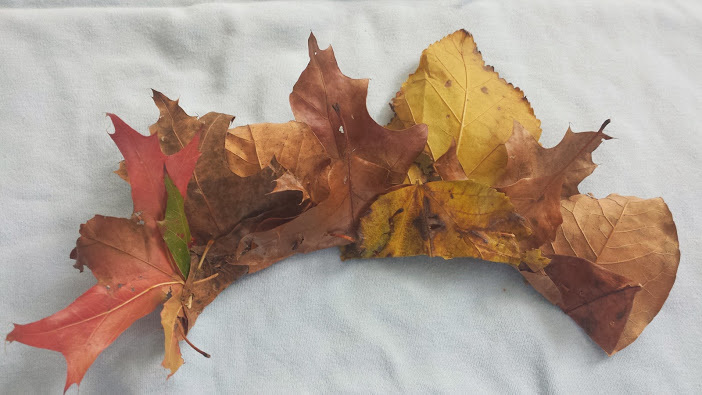
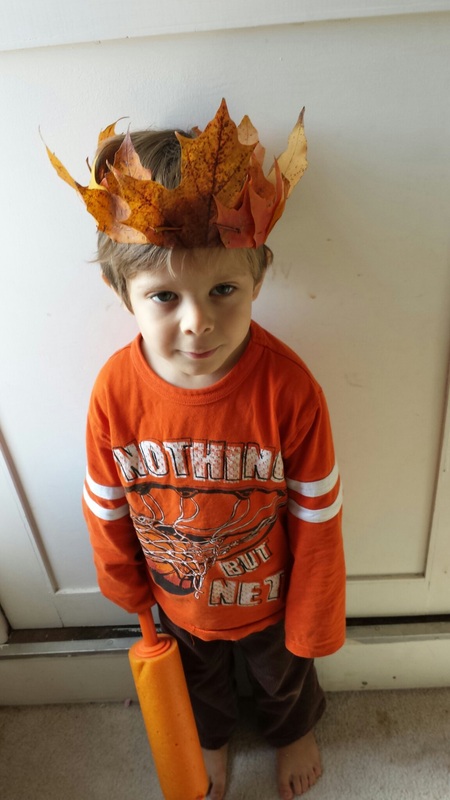 Z's crown last year Autumn Leaf Crowns TutorialNo glue, no scissors, no tape, no mess! Just go outside! First, play a game with your kids gathering the leaves. You will need a pretty big pile, depending on how many crowns and how big their heads are, and the size of the leaves. Choose a variety of shapes and sizes, and try to pick out one special leaf to use for the front. I like to choose a taller, more colorful one for the front of the crown.Look for leaves that haven't dried out completely. If they are too crunchy, they will fall apart and will not be usable. Look for leaves that can bend in half without breaking. Some of the ones I used in these photos were a little too dry, but they still worked out. Now, take your leaves and remove the stems. Set these aside; do not throw away, as you will need them later! 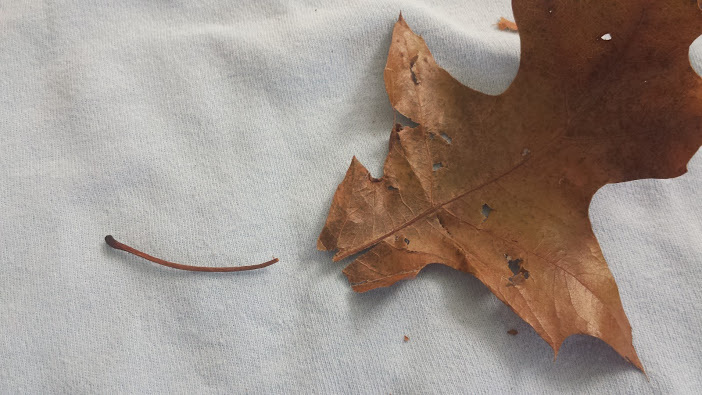 Next, you will bend the very bottom of the leaf behind itself. Bend only about 1/4th of the leaf, keeping the rest standing up tall. Take another leaf, do the same, and then layer it inside of the first leaf, kind of like putting together a taco! 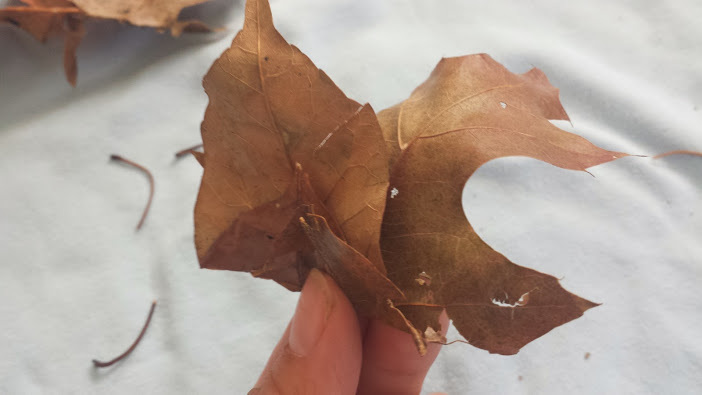 Two leaves layered together. The leaf on the left is resting inside of the other leaf's fold. Now, use the stem from the leaf to pierce through both layers of leaf. You are basically "sewing" the leaves together with the stem. From the back of the leaves, poke the stem through across what will be the front of the crown, then poke another hole to the back and leave it there. Continue these steps until you have a chain long enough to circle around your head.
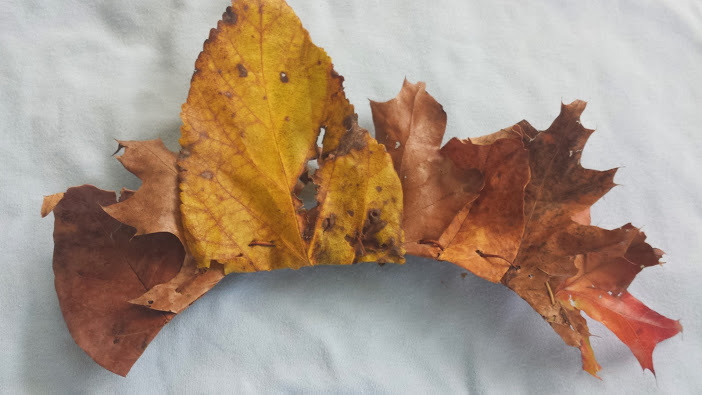 When you are done, close the circlet by "sewing" the two ends together with a stem, just as the rest of the crown is. 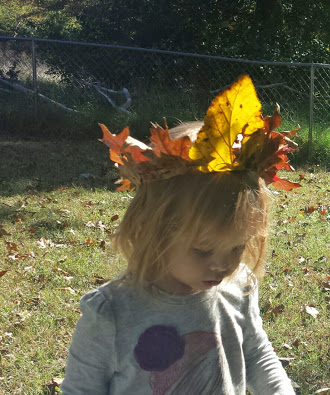 I hope I've inspired you to run outside and enjoy the beautiful weather and to do a craft with your little ones! Have fun, and thanks for reading!
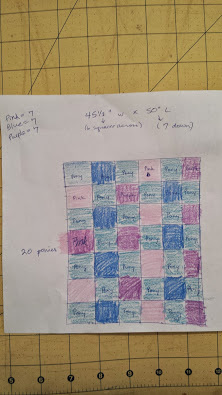
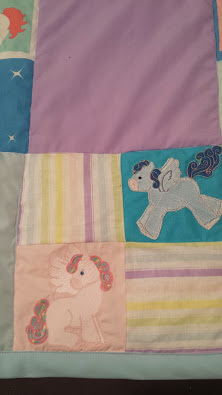
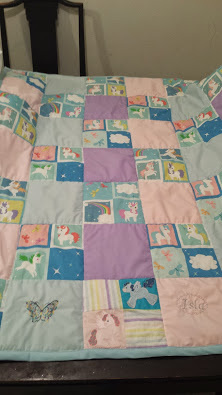 It's been a while since my last blog post, but things have been pretty hectic. I have, however, managed to find time to play around some more with my new fancy embroidery/sewing machine. Someone warned me that machine embroidery was addicting, and boy were they right! My embroidery machine is the Brother SE-400. It is a great beginner/hobbyist machine, and does everything I need and want in a sewing machine, plus has some great embroidery features as well. I've been having some fun browsing all of the free and cheap embroidery files on websites such as annthegran.com and embroiderydesigns.com. I can choose my design and upload it to my machine with a simple USB cable. It's been several years since my last attempt to make a quilt - and I was far from happy with how that one came out - but I was determined that it was time to try again. I had ordered a yard of cotton fabric from my favorite fabric site, Spoonflower.com, a couple of months ago. I wanted a crib-sized blanket for my daughter as she transitioned to a toddler bed, and she is crazy about ponies. Not only does Spoonflower have hundreds of adorable pony prints, but I had accumulated enough "Spoondollars" (store credit) as a designer from the sales I have made with my fabric designs. It was tough narrowing down the choices, but I finally settled on this adorable Little Unicorns Cheater Quilt design:  If that's not the cutest unicorn print on the internet, I'll eat my hat. Anyways, of course I just HAD to have it. I ordered a yard and since I knew it would not be large enough for the size blanket I wanted to make, I went to my local fabric store and picked up some solid cotton fabric in pink, blue and purple. Then I found a striped print in coordinating colors that matched perfectly. They were all on sale, so I didn't spend more than $10! I also found some crib-sized batting on sale for under $5, and then bought two packets of double-fold bias tape quilt binding for $1.50 apiece (coupons!). Once I was ready to start work on this blanket, I cut the unicorn print into squares. The print is already designed into faux quilt squares, so I didn't need to measure or use a ruler. This quilt took quite a bit of math, but with my trusty calculator and a quickly drawn outline of my design, I figured out how many squares of each color I would need, and how they would be laid out. I discovered that I was 1 square short of the unicorn design, but I improvised by downloading a $2.45 embroidery design from Etsy. It was a set of 10 different little Pegasus ponies and I embroidered them both and made my own quilt square for them, as you can see here:
I decided to make the bottom strip the only one with embroidery, so I added some personalized touches to the solid color blocks as well. For the blue square, I embroidered a butterfly with some rainbow thread; for the pink, I embroidered my daughter's name in silver and added an oval border; for the purple block, I used a free embroidery design from www.embroiderydesigns.com that says: You are Loved. 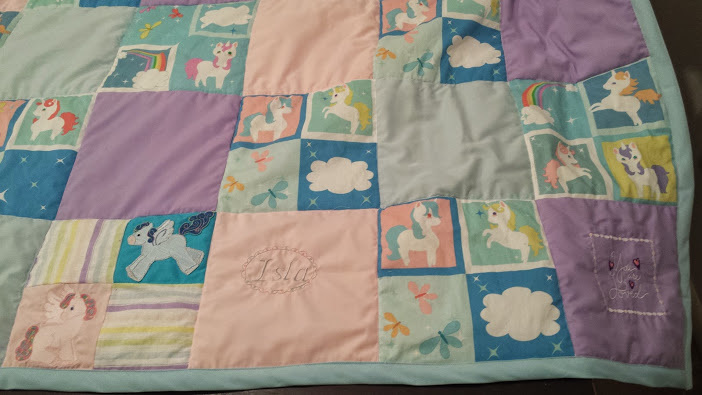 The next part was the easiest part: sewing the strips. I pinned the squares to one another horizontally, one strip at a time. Then I matched them up with the strip below (right sides together) until it was one solid piece. Next, I sandwiched the batting in between the bottom piece of fabric (right side down) and the top piece (right side up). I ended up being about 4" short on the vertical side of the quilt backing, so I had to improvise and sew two 2" strips of the striped fabric along both sides. I ended up loving how it turned out, because I turned the stripes horizontally: 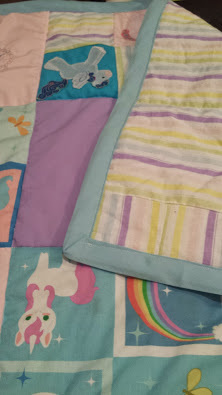 Next step was the actual "quilting". This is where you basically tack down the three layers together so that they won't shift or bunch up on the inside when you use and wash your blanket. For this quilt, I did the old "stitch in the ditch" method, where you sew a straight line alongside the seams that hold the squares together. To prep my fabric for this step, I pinned the layers all over with safety pins (lots and lots of safety pins!). I started from the middle of the quilt and worked my way outwards, toward the edges. I used my walking foot attachment to keep the layers straight, but that is optional and can be done with a standard sewing foot. Once that was finished, I could remove the pins and finish the quilt.
For this quilt, I finished with double-fold bias tape quilt binding. This binding is already ironed in half, so all you do to sew it on is to sandwich the edge of your fabric (making sure you catch all of the layers inside) and then sew a straight seam. It was a lot easier than I had imagined! I had to watch a couple of YouTube videos to learn how to fold the corners in, but t definitely wasn't as scary as I had expected. My previous experience with bias tape has been only with very small projects, and I was terrified of messing this up! In the end, I was very satisfied with how it came out. I think this is a great basic project for any intermediate seamstress/tailor and can be an inexpensive baby gift if you find a great deal on the fabric and batting, like I did. Quilts are always a useful gift, and there's hardly a more personal, loving handmade gift more wonderful than a quilt. Have you ever attempted a quilt? Share your successes (and fails too, if you are not too embarrassed - we all had to start somewhere, right?)! Someone recently asked me how babywearing could possibly be that "practical" in our modern US society. Unless you live in an extremely crowded metropolitan area with more public transportation than private, modern parents spend most of their time driving rather than walking. Therefore, how can it be more convenient to wrap or buckle your child to you every single time you get out of the vehicle than to, say, whip out the stroller, or place the child in the shopping cart? The truth is, babywearing is more convenient, for parent and for baby. Strollers and infant car seat carriers have their place, but I have found babywearing to be far more versatile and helpful to me as a busy mom on the go. My first carrier was a borrowed Sleepy Wrap, which is similar to a Moby. These are a simple length of stretchy fabric that you wrap and tie around yourself and baby. I found this wrap to be so helpful with my newborn. It was not only a carrier, but also a blanket and nursing cover. In addition to this wrap, I had a woven wrap, an Ellvill Zara. I also borrowed an Ergo carrier from a friend and found it especially helpful when I was in a hurry and wasn't as experienced at wrapping with my Sleepy Wrap or woven wrap. In the days after I brought my daughter home, I was delighted with how easy it was to wrap her in it and get stuff done around the house. I could sew, nurse and hold her at the same time. Play with my older son, make lunch, fold laundry and more. I practiced different wrapping techniques to find carries that I liked best, so that when I was in public, I could just step out of the car, wrap her up and go! When I was explaining all of this to the aforementioned person, I mentioned the fact that pulling the stroller out of my trunk, adjusting it and convincing my daughter to STAY in it for more than 12 seconds - is a lot more of a hassle to me. Besides the fact that it is difficult to maneuver your way through a crowd with a stroller (I am apparently terrible at strolling and am more of a crowd weaver), there's also the annoying eventuality of ending up pushing an empty stroller through the store while your toddler grabs toys, knock over displays and hides unpaid objects in the basket of the stroller (true story). When she is on my back, my daughter is excited - what kid doesn't like piggyback rides?! - and I am excited to be able to actually pay attention to what I am doing. Strollers definitely have their place (the basket underneath is handy for storage, which is great for the times I walk to the grocery store), but most of the time I find them cumbersome. Babywearing newborns also has a significant effect on the baby's development and comfort. Baby feels more secure, sleeps better and is generally more content. In short, less crying. But even for older babies, whom your great aunt thinks is "too old" to be carried around on your back, the benefits of babywearing are also just as obvious. As mentioned above, the child has less opportunity to cause havoc running through stores, touching and knocking over displays, crying over toys that are not being purchased...the list is endless. I am willing to bet that all experienced mothers have one or more embarrassing stories like these! But more importantly, though your child is not an infant any longer, he or she still needs the comfort and security that only a parent holding them can provide. For you newer parents and/or families new to the concept of babywearing, please know this: EVERY baby, toddler and child goes through clingy, needy and demanding stages. Actually, let me correct myself; there is really just one looonnnnng stage of neediness, and it lasts several years! It is perfectly normal for your toddler to not want to be put down, for their legs to get tired, for them to be overwhelmed or overstimulated in a strange place and ask you to carry them in public. Babywearing does not spoil them, or encourage clingyness. It has very little to do with parenting and more to do with acceptance. When you accept that your child will need you to hold them and carry them (and as you know, children can be pretty stubborn and LOUD about these requests), you will be glad that you have a comfortable carrier on hand! So be prepared for the inevitable! If you are unusure and would rather be shown how to babywear in person, look online to see if there is a local babywearing group. Facebook is a great way to search for these, and ask around. I've found that many natural parenting stores, cloth diaper stores and birthing centers have very knowledgeable employees that can guide you to a local babywearing chapter as well. Many of these groups offer a "library" where you can rent PR borrow carriers for free, or have some for sale or barter. As always, feel free to send me an email if you have a question about babywearing or carriers, natural parenting options, cloth diapers and more! I'd love to hear from you. Comment below, or email using the contact form on this site under "Contact". Happy babywearing! 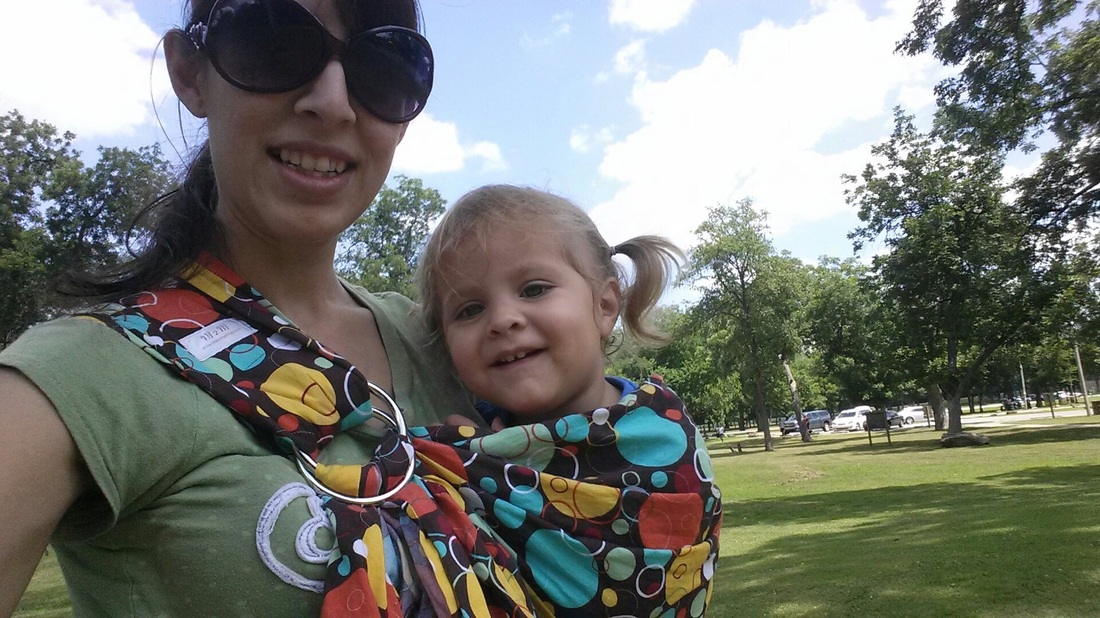
We woke up to a rainy Saturday morning and the kids and I decided that it was the perfect day for doughnuts. I didn't have time for yeast recipes, which require kneading and rising, and I don't own a doughnut baking pan do cake doughnuts, so I search until I found one that did not require yeast. They turned out so delicious that I just had to share it with you, so here is a wonderful yeast-free recipe for fried doughnuts/donuts (however you prefer to spell it): *Original recipe was found on Allrecipes.com, but I had to change the measurements, based on the reviews of the recipe and my available ingredients, so here is my version* Yeast-Free Quick and Easy Doughnuts Yields about a dozen small doughnuts, or 5-6 large ones 2 tablespoons white vinegar 1/2 cup milk 2 tablespoons butter, softened but not melted 1/2 cup white sugar 1 egg 1/2 teaspoon vanilla extract 2 cups flour 1/2 teaspoon baking soda 1/4 teaspoon salt 1 quart of vegetables oil for frying confectioner's sugar for dusting (optional) 1. Stir the vinegar into the milk and let it sit. 2. In a medium bowl, cream together butter and sugar until smooth and even. Add the egg and vanilla. 3. In a separate bowl, put the flour, baking soda and salt into a sifter (I use a small colander!) and soft together. 4. Stir the flour mixture into the sugar mixture, alternating with the milk/vinegar mix. 5. Roll out onto a floured surface and cut out into doughnut shapes. I used a glass for the larger circle, then a bottle cap or the small hole in the middle. Let sit for 10 minutes, while you prepare the skillet for frying. 6. In a large, deep skillet, pour your vegetable oil in and heat on med-high. Oil is ready when drop of water sizzle on contact. Place the doughnuts in and wait about a minute or so, until the bottom becomes hard and golden brown. Turn over with a fork and repeat. Use the smaller inner pieces cut out with the bottle cap for donut holes and throw them in, too! 7. Let them cool on paper towels, or on a baking rack. When cool, you can dust them with confectioner's sugar, or if you're like me and ran out of powdered sugar, brush some melted butter over them and sprinkle with granulated sugar. You could also make a frosting or simple icing using powdered sugar, if desired. Good morning, doughnuts. I love you. 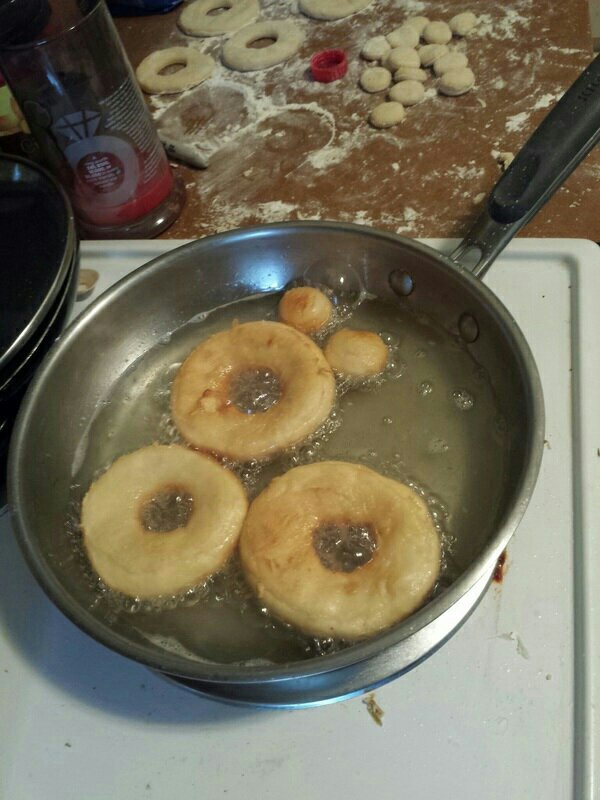
A bit messy, but well worth it!
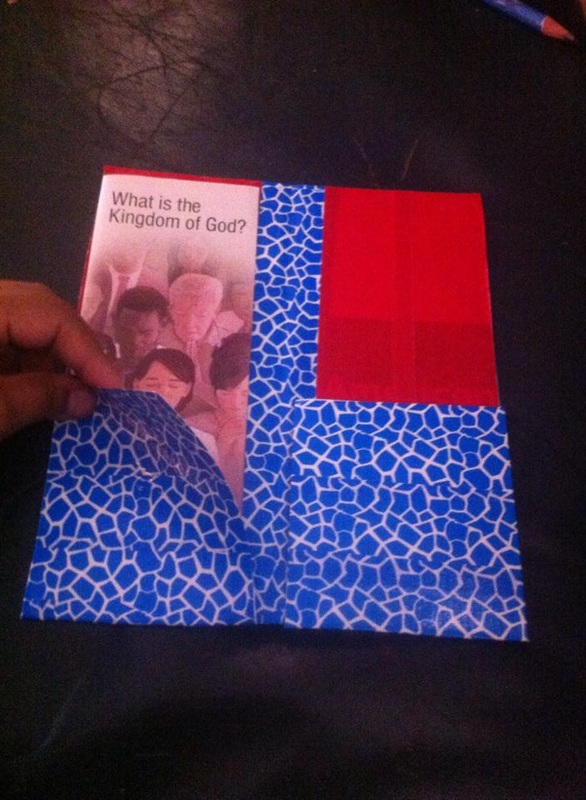
 As some of you may know (you are either participating in this campaign, or have gotten a knock on your door!), the month of August is a momentous one in the history of Jehovah's Witnesses. These special tracts are being distributed simultaneously throughout the entire world, directing attention to jw.org - a great resource for Bible education. To assist in the distribution of tracts, my friend, Michele, has come up with a genius DIY project - tract holders! Here are her quick and easy instructions (photos are not mine): 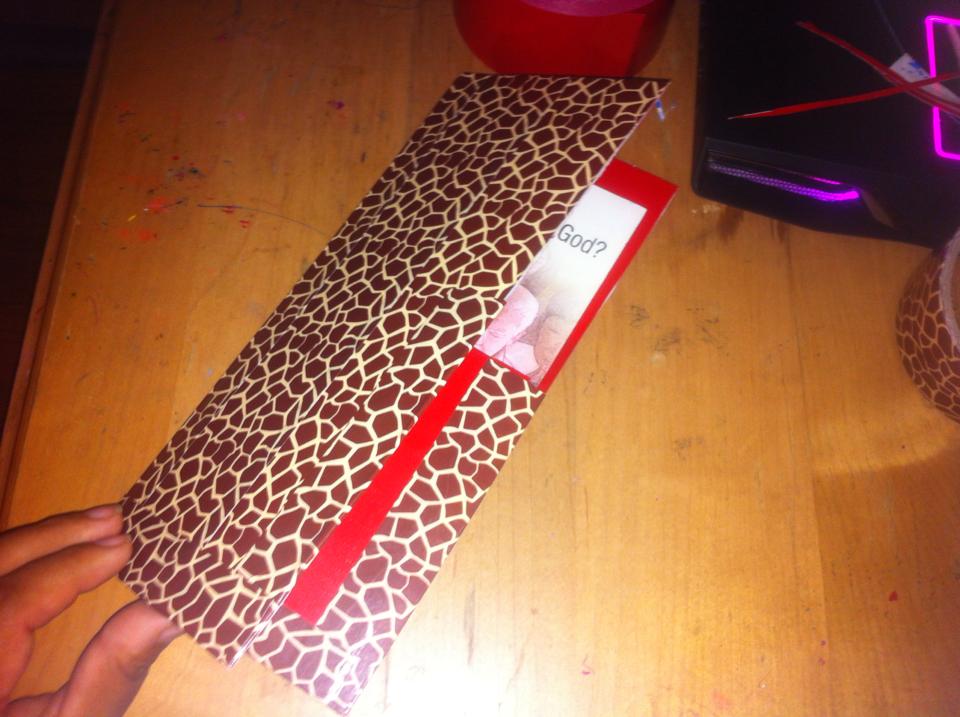 Supplies:
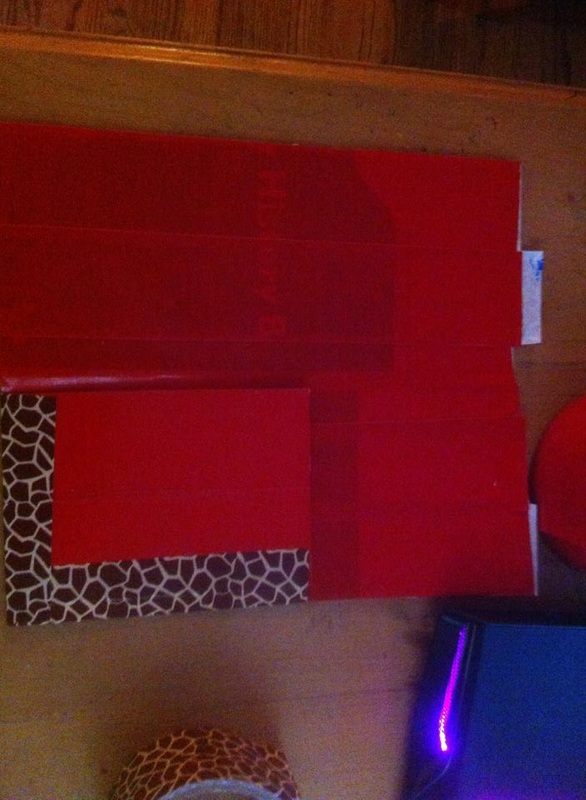
Step 1: Cut hard stock paper bigger than the tract. Place less than 1/2 inch apart for folding ease. 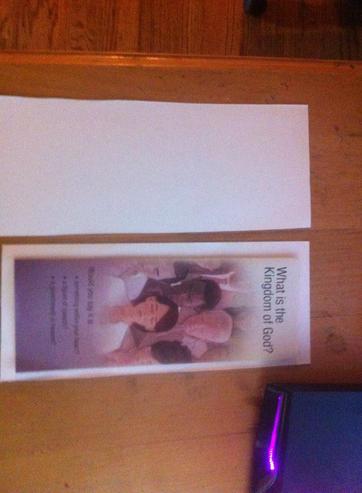 Step 2: Cover outside in duct tape. You can buy cool designs at the dollar store. 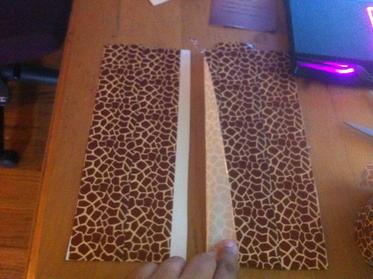 Step 3 Cover the gap in between the two sides. You can use a contrasting color or print. This one is red on the inside, and you can see that the larger gap allows the holder to bend in half more easily. 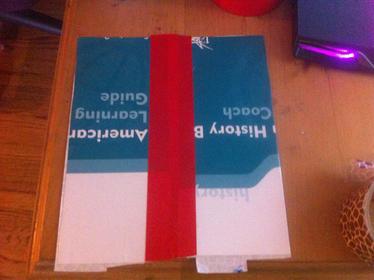 Step 4: Cut a smaller piece of card stock and cover it in the same tape that you are using for the inside (see smaller red square on the right). 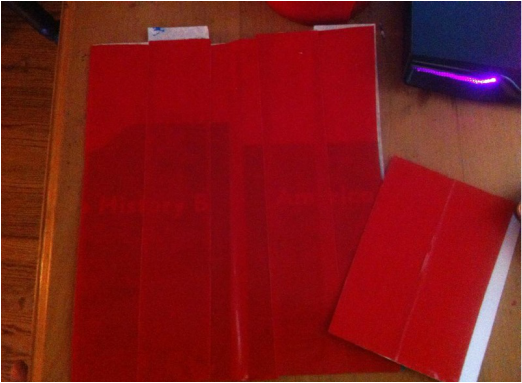 Step 5: Attach the smaller pieces to either side of the holder by placing some tape alongside the edges, overlapping both sides. Be sure to use the same pattern/color duck tape that you used for the outer design.
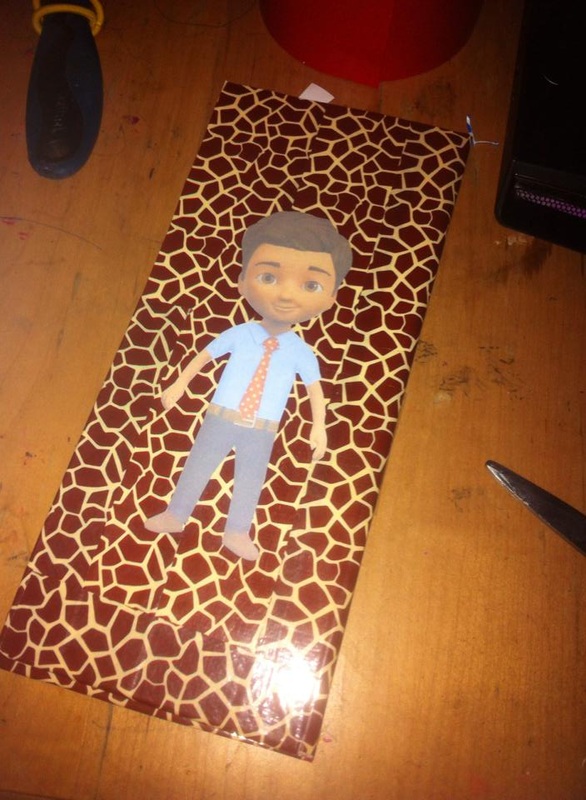
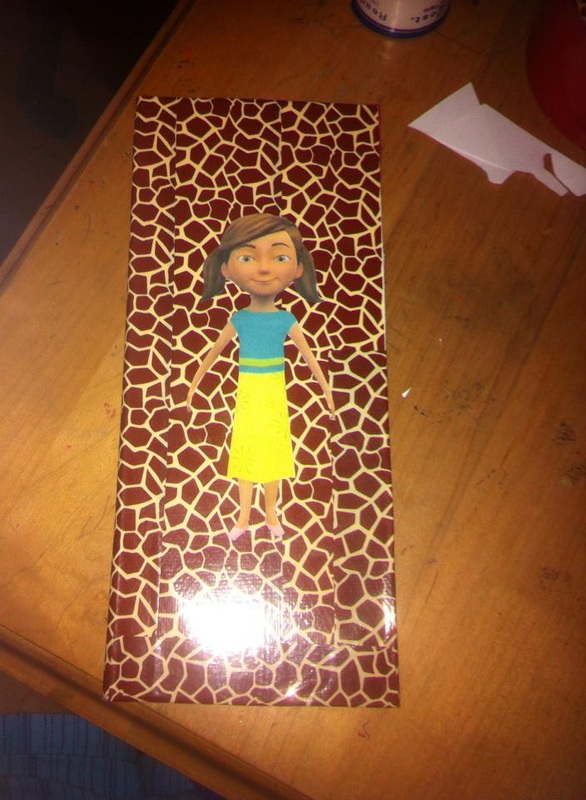
You can customize it if you like, but if not, you are done! Michele finished hers off with cutouts of Caleb and Sophia (the stars of the jw.org series, Become Jehovah's Friend). She attached them by cutting out the printed images and taping over them with clear packing tape. So simple and quick! You can see her finished tract holders:
If you are participating in this campaign, maybe you can try this project with some younger ones. Feel free to pin, share and/or comment below. Thanks for reading, and a big thanks to Michele for sharing her wonderful idea!  |
Meet & GreetHi! My name is Astrid and I am an unschooling, working mama of 3 with an intense need to design, craft and create. Follow me for ideas, tutorials, DIY projects, homeschooling resources and more. Archives
March 2017
Categories
All
|

 RSS Feed
